> For the complete documentation index, see [llms.txt](https://docs.sandbox.game/en/llms.txt). Markdown versions of documentation pages are available by appending `.md` to page URLs; this page is available as [Markdown](https://docs.sandbox.game/en/creator/game-maker/creative-guides/experience-design-techniques/3d-spatial-layout/rough-base-map.md).
# Rough Base Map
Spend more time planning your layout so you will spend much less time revising it later.
## Solidify Your Ideas
{% tabs %}
{% tab title="Design Considerations" %}
### Design Considerations
* List all areas where gameplay will occur and [**estimate the space needed**](/en/creator/basics/scale.md) (small, medium, larger). **This may include:** Social meetups, quests, boss fights, parkour zones, quests, view points, hidden zones, limited access content (using [**NFT Sensor**](/en/creator/game-maker/docs/components/nft/nft-sensor.md)), etc.
* Plan where the entrance(s) and exit(s) of each play area will be to provide the best flow through each area and the best transitional views.
* Decide the best way to arrange your play areas to connect to each other, shifting your 2D mindset into a 3D one.
{% endtab %}
{% tab title="Start in 2D" %}
### Start Planning in 2D
It's easier to start thinking in 2D when planning how areas for game events will connect. Sketching out ideas in a top-down or side perspective to test rough ideas fast.
{% endtab %}
{% tab title="Shift to 3D" %}
### Shift to Planning in 3D
Make rough 3D sketches, arrane play areas to align, and begin planning use of vertical space.
{% hint style="success" %}
**TRY AI**
If you feel stuck, try prompting an AI image generation tool with keywords from your design plan to get some inspiration.
{% endhint %}
{% endtab %}
{% endtabs %}
## Build a Mini Blockout
{% hint style="warning" %}
**USE VOXEDIT**\
Game Maker is an excellent *building* tool, but you can't easily move blocks if you change your mind, which happens constantly when planning a base map.
:star: VoxEdit is a fantastic *planning* tool to build a rough base map. It's easy to select and move voxels and you can build your model to scale with your Experience: **1 voxel = 1 block**
{% endhint %}
{% tabs %}
{% tab title="Design Considerations" %}
### Design Considerations
* Build your model at scale with your Experience size for easy translation into Game Maker
* Take advantage of vertical space when it makes sense to make your Experience feel grand
* Zoom in to test the player perspective as you move between play areas and adjust as needed
* Colour code play areas to communicate design more easily (don't paint it realistically)
* Use one colour for the intended play path for your Experience's design
* Use one colour for potential paths to help anticipate and visualize player decision making
{% endtab %}
{% tab title="Example" %}
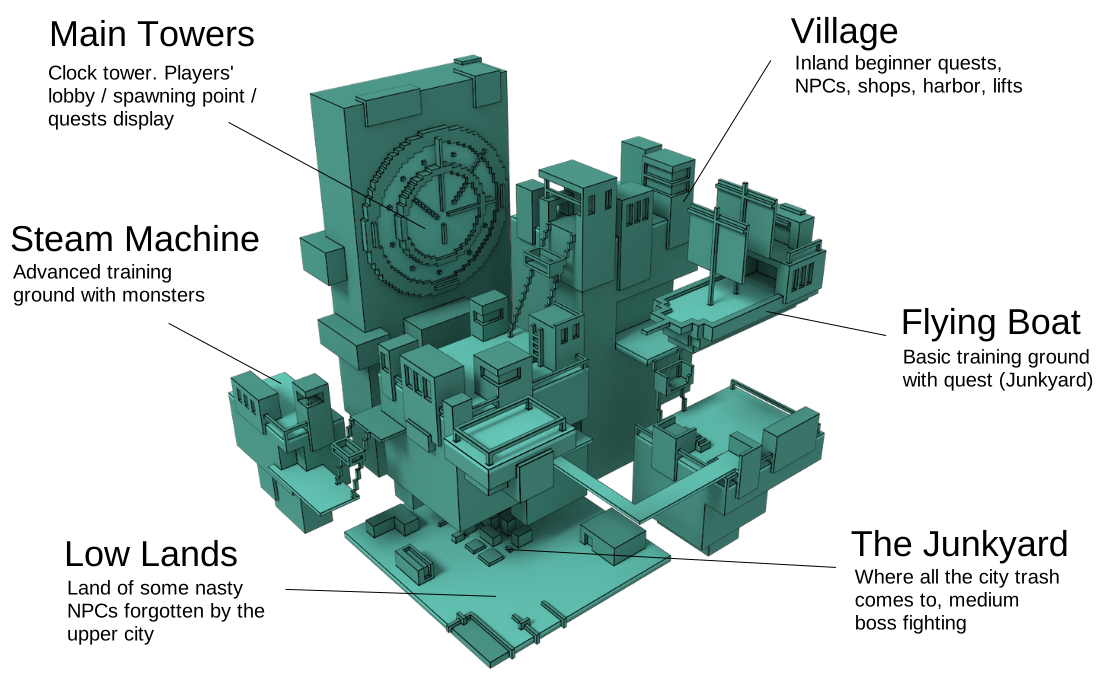
**Example:**
This monchrome mini blockout provides enough detail for level designers to easily figure out where most larger assets belong and the general layout of the Experience with labels added.
You can also colour code areas for game events and use the same colour code system later to track assets that will be used in those areas.
 {% endtab %}
{% endtabs %}
---
# Agent Instructions
This documentation is published with GitBook. GitBook is the documentation platform designed so that both humans and AI agents can read, navigate, and reason over technical content effectively. Learn more at gitbook.com.
## Querying This Documentation
If you need additional information that is not directly available in this page, you can query the documentation by asking a question.
Perform an HTTP GET request on the following URL with the `ask` and `goal` query parameters:
```
GET https://docs.sandbox.game/en/creator/game-maker/creative-guides/experience-design-techniques/3d-spatial-layout/rough-base-map.md?ask=&goal=
```
`ask` is the immediate question: it should be specific, self-contained, and written in natural language.
`goal` is what the user is ultimately trying to achieve, the reason they need the answer. Sharing it helps GitBook give you a better, more relevant answer. A goal is most helpful when it describes the outcome the user wants rather than restating the question. For example, with `ask=how do I create an API token`, a goal like `automate deployments from our CI pipeline` lets GitBook tailor the answer to that use case.
The response will contain a direct answer to the question and relevant excerpts and sources from the documentation.
Use this mechanism when the answer is not explicitly present in the current page, you need clarification or additional context, or you want to retrieve related documentation sections.
{% endtab %}
{% endtabs %}
---
# Agent Instructions
This documentation is published with GitBook. GitBook is the documentation platform designed so that both humans and AI agents can read, navigate, and reason over technical content effectively. Learn more at gitbook.com.
## Querying This Documentation
If you need additional information that is not directly available in this page, you can query the documentation by asking a question.
Perform an HTTP GET request on the following URL with the `ask` and `goal` query parameters:
```
GET https://docs.sandbox.game/en/creator/game-maker/creative-guides/experience-design-techniques/3d-spatial-layout/rough-base-map.md?ask=&goal=
```
`ask` is the immediate question: it should be specific, self-contained, and written in natural language.
`goal` is what the user is ultimately trying to achieve, the reason they need the answer. Sharing it helps GitBook give you a better, more relevant answer. A goal is most helpful when it describes the outcome the user wants rather than restating the question. For example, with `ask=how do I create an API token`, a goal like `automate deployments from our CI pipeline` lets GitBook tailor the answer to that use case.
The response will contain a direct answer to the question and relevant excerpts and sources from the documentation.
Use this mechanism when the answer is not explicitly present in the current page, you need clarification or additional context, or you want to retrieve related documentation sections.


